September 9th, 2008
So You Wanna Do It Yourself, Eh?
Published on September 9th, 2008 @ 11:43:35 am , using 746 words,
Reflections on September 2006
It all started with my seat. (No, the one on my bike - a 2006 Harley-Davidson Ultra Classic.)
The stock seat on my Ultra was fine for short rides, but it got uncomfortable after a few hundred miles in a day. So I got a new seat. Installed it myself in a few minutes. Easy. Little did I know what that change really meant.
The new seat moved my considerable backside at least an inch back on the bike. I now needed binoculars to see the handlebar. So, I decided to change the handlebar myself. Hey, how hard could it be? I'd removed the handlebar on my Sportster easily enough -- just 4 bolts on top. No big deal. Yeah, sure, you betcha.
So I got new handlebars and set out to put them on.
Step 1. Remove the windshield and front fairing. Okay, I knew that was coming.
Step 2. Remove the fairing cap. I had to look it up to see what it was! That little piece of plastic required removing the ignition switch and unplugging a wiring harness first.
Step 3. Remove the CB radio, then remove the regular radio. Translation: unplug the CB antenna, unplug the regular radio antenna, disconnect three wiring harnesses to the radios, disconnect three other wiring harnesses that are in the way, unbundle 15 wires, remove 18 screws (four of which you can't see), and remove a partridge from a pear tree.
Step 4. Remove brake and clutch controls. Check.
Step 5. Remove handlebar switches. Check. Have you ever removed the throttle grip and its origami-like tangle of control cables and electrical wires? I can now perform neurosurgery.
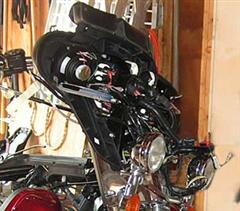
Step 6. Replace handlebar. Ah, at last. An easy part. Just four bolts (all of which are partially covered by the remaining fairings, requiring you to use all three hands to get to them).
Step 7. Install new throttle and idle cables. Okay, I guess I wasn't too surprised at that. Fortunately, they're a breeze to install. Just remove air cleaner. Then remove the seat and Tour Pak. Then the fuel tank; disconnect the crossover hose, gas feed line, center console, gas gauge wiring harness, fuel overflow hose, CB/Intercom wiring harness, three more bolts, and seven lords a leaping. THEN it's time to UN-thread the throttle and idle cables from the carburetor; but you can't see what you're doing unless you: a) have a very bright light, b) have several small mirrors, and c) are a contortionist. And that's just to SEE the cables. To actually disconnect the old and connect the new -- well, you have to pray for a miracle of Biblical proportions.
 Who'd have thought that replacing the handlebars on a motorcycle would require the use of an oil drip-pan?!? |
Step 8. Get and install a new clutch cable. Okay, I didn't see that coming. But what's another new cable at this point? After all the work with the throttle and idle cables, I was READY for an easy task. Sure.
Step 8a. Drain the transmission fluid.
Step 8b. Remove rider and passenger floorboards.
Step 8c. Remove exhaust system. (No, I'm not kidding!)
Step 8d. Remove and disassemble an oriental puzzle of pieces inside the transmission side cover.
Step 8e. Put the new cable where the old one went. Easier said than done! Then reassemble that torture puzzle.
Step 9. Don't forget the new front brake lines. Drain the old brake fluid, replace all the lines, add NEW fluid, and then bleed the lines (doing that alone was like juggling bowling balls while crocheting a nice doily).
Step 10. Put all that stuff you took OFF back ON. So after several new gaskets, four rolls of paper towels, and an entire box of Band-Aids, my new seat (and all the rest) is finally in place.
One thing I've grown to appreciate more than ever -- that's the talent of the mechanics working at the shop. Next time you have any "simple work" done, don't complain about the labor cost. Those guys earned it!
By the way, I've got several pieces left over, if anyone's interested in spare parts. I also have one end of a wiring harness hanging down, but I'm sure I'll need it sooner or later.
It may have been easier just to get a new seat. (No, THIS time I DO mean MY seat!)
by a Very Disillusioned Do-It-Yourselfer
.....
July 27th, 2008
Chef Larry
Published on July 27th, 2008 @ 02:52:21 pm , using 1216 words,
Mom's Cake Revisited -- and Remembered
For some reason, I started thinking about trying to make a pineapple upside down cake from Mom's old recipe. I don't know what prompted that notion, but I've toyed with it for a couple months. So the next time I went to Wal-Mart, I started picking up the ingredients I'd need to make it.
I say "started picking up" the ingredients, because it took a couple trips -- the more I examined the recipe, the more I realized I was missing something else. Of course, I knew I needed some pineapple, so I got that. I had pretty much all the other ingredients. Well, except for the pecans. And I was fresh out of eggs, having used up my last egg back a couple months ago. Oh, and the recipe called for flour. Who knew?
On my next trip to Wal-Mart, I picked up the baking powder (did you know that's different from baking soda?). I also re-read the recipe and realized I'd forgotten the brown sugar. Got that. And the butter. It called for 1/4 cup of butter. Ever try to buy 1/4 cup of butter? Stores must think I'm opening a bakery -- the smallest package of butter was a 1-pound (2-cup) box. There were four sticks of butter inside the 2-cup, 1-pound box. So if I need 1/4 cup, then I'd need.... let's see, 4 sticks times 2 cups is 8, divided by 1/4, times 1 box, carry the three .... hell, I have no idea how much to use.
Then I made another a quick trip back to Wally's to get vanilla. Gosh, you'd think I'd have HAD vanilla.
So I finally get all the pieces together and roll up my sleeves. I knew I was in deep when the first step was to separate 4 eggs. I put one here, one over there, the third in the living room, and put the fourth outside. In step 2, I realized I'd misunderstood step 1.
I continued wading through the "simple" recipe -- at least it looked simple -- for the next hour. I finally got ready to combine everything into the "cooking instrument." Mom always used a 10" iron skillet. I don't have one of those, and don't care to get one. So I found two smaller (9") Pyrex baking pans and decided to use them instead. You know, I was pretty good at math when I was younger, but combine math and cooking and I'm a moron. Obviously two 9" rectangular pans don't quite equal one 10" round pan. The results proved it, by the way.
So before I assembled all the parts into the two cake pans, I cleaned out and turned on the oven, and put my little oven thermometer inside on the top rack. Once I finished putting it all together, I was ready to shove them into the oven. But it was still cold inside. COLD. Hmmm. Who'd have ever guessed there are TWO knobs you have to set to make the damn oven come on? So I waited while it warmed up, then put the cakes in for a half-hour dry sauna.
The end result? The cakes came out substantially thinner than Mom's -- having spread out the single recipe over two large pans instead of one smaller....duh. But aside from that, they're GREAT. Yum.
(And in case you were very observant, have a great memory, and you're still wondering, the next time I try the pineapple upside down cake recipe I'll also try to remember to buy cherries for the top. Or is it the bottom. Crap. They'll go in there somewhere, assuming I actually remember them.)
So what to do with the rest of all those darn supplies I bought just for this cake? The thought occurred to me that I could pull out Mom's recipe for sugar cookies. That'd use up the other two eggs (I only bought 6), some of the sugar, and most of the flour. Of course, that meant another trip to Wally's to get a bottle of lemon extract. (And I splurged and got some macadamia nuts and white chocolate chips to add to the mix!)
I started the Big Cookie Project while the cakes were still baking. I didn't them right away, but mixed them together and shoved them into the refrigerator -- chilling, per instructions. They may turn out okay, but I don't know. I didn't have any cream, so I substituted prayer. And my recipe called for "soda" -- okay, I'm smart enough to know not to add Coke. But I wasn't sure if it meant baking soda, bicarbonated soda, or what. So I found a box of Arm & Hammer refrigerator baking soda and used some of that. I hope that won't kill me. I also tossed in a bit of baking powder, too; just to be safe -- what could it hurt? (Besides, I've got enough baking powder to last me 12 lifetimes, so may as well use some!)
I'll try baking the cookies later. Hopefully they'll be edible -- and won't explode.
"Costs" for my Great Cake Cooking Day?
- Supplies - $$$ I have no idea, really. Since I had NONE of the ingredients to start with (except for salt), I had to buy everything
- Four trips to Wal-Mart, 18 miles round-trip each time
- 1 hour finding bowls, pans, utensils, and other hardware needed
- 15 minutes finding the oven; and another 10 figuring out how to turn the damn thing on
- 2 hours mixing, folding, creaming, beating, and blending ingredients, PLUS all the time I needed to look up what those terms meant
- 30 minutes baking
- 1 hour cleaning up the mess in the kitchen and doing dishes
- 30 minutes doing laundry (all the towels and clothes I covered with flying debris and pineapple juice)
But the taste of Mom's pineapple upside down cake again? Priceless.
-- by Chef Larry
****** CONTINUATION *****
"The Big Cookie Finish"
So I learned a couple new things.
First, when a recipe says to put your semi-finished cookie-dough product in the refrigerator to "chill," it probably means a relatively short time -- at least when compared to the age of the universe. Probably something like an hour or three. Not three or four days.
Second, when you put a mixture of butter, sugar and flour in the oven, they become cookies. But when you put a mixture of butter, sugar and flour in the refrigerator for several days, they become concrete.
After several days of chilling my dough, I fired up the oven to bake my lovely cookie concoction. But when I pulled the mix out of the fridge (where it's definitely had time to "chill"), it was more the consistency of a boat anchor. I tried everything but using it as a bowling ball, and it wouldn't mix, crumble, break apart, fold, blend, or staple. It was simply solid. But since the oven was already warming up, I had no alternative but to take drastic measures. I popped the 5-pound ball of calories into the microwave for 60 seconds. To my surprise, instead of coming out as one gigantic cookie, it actually softened up so I could work with it again.
A few minutes later, I had batches of cookies going into and coming out of the oven.
Okay, so I learned a couple more new things.
First, I can't bake.
Second, even burnt cookies can taste mighty good!
....
July 27th, 2008
Subject: My $20 snack
Published on July 27th, 2008 @ 02:51:26 pm , using 434 words,
While at Disney World (specifically, in the Magic Kingdom), I led the "Dole Whip Brigade." At the entrance to Adventureland, there's a small shop that sells a little dessert snack called "Dole Whip" -- a pineapple-flavored ice-cream-like substance that's absolutely addictive. I head there at least once every trip to the Magic Kingdom, often twice in a visit. While there with "the girls" (my sister, her daughter, and her daughter's two daughters -- but that's a "whole 'nother story"), I introduced them to this treat.
Not wanting to leave the Disney Magic behind, my niece, Sandy, experimented with ingredients to try and recreate a Dole Whip herself. She was plenty successful, too. And she shared her recipe with me. I modified it only slightly -- using vanilla ice cream as a base instead of frozen yogurt.
She said to run the mix in a blender for a little bit to smooth it together. But not having a blender .... well, I wondered how successful I'd be if I tried. So when I went to Wal-Mart, I saw a cheap $16 blender and snapped it right up, along with a half-gallon of ice cream and a can of pineapple juice concentrate.
I mixed up a small batch in my new blender. It wasn't too bad, but didn't taste quite the same. I stored the results in the freezer to let it harden up a bit.
Later, I cracked open that container, and was surprised to find the taste had mellowed out and was very much like the Disney version. SUCCESS after all!
So, armed with this boost to my confidence, I loaded up the blender with a more substantial batch of ice cream, pineapple concentrate, and water. I watched as it bucked and rumbled as the ingredients started mixing together. Finally, it was getting smooth and flowing in that lovely pineapple-colored swirl inside the blender. I turned around to the counter to clean up the mess I'd made. As I was doing that, I heard the blender slow down -- a lot. I turned and looked at my latest creation, now completely engulfed in a shroud of smoke.
The BAD News: One $16 blender is now ready for the recycling bin. And my house now stinks.
The GOOD News: The batch of "faux Dole Whip" was safe and secure - and is now in the freezer.
But overall, consider this. At Disney World, a small cup of Dole Whip costs $3.50. I got a whole half-gallon of the stuff for $20. I definitely came out ahead -- and I didn't have to pay for a park ticket or the parking!
....